How to Install Ceiling Fans
It's easier than you think, even on an angled cap.
![]() Time
Time
A full daylight
![]() Complexness
Complexness
Intermediate
![]() Cost
Cost
$101–250
Introduction
A ceiling fan improves cooling in summer and heating in winter. The result: You feel more comfortable while you pull through on utility bills. And installing them yourself is much easier, thanks to unexampled, strong hanging systems and electronic controls. We show you how to avoid demotic pitfalls when installing one yourself.
Tools Required
Materials Required
- Cap fan
- Fan brace and box assembly
- Switch
- Telegraph connectors
Project gradual (13)
Step out 1
Overview and getting started
Measure the ceiling pitch
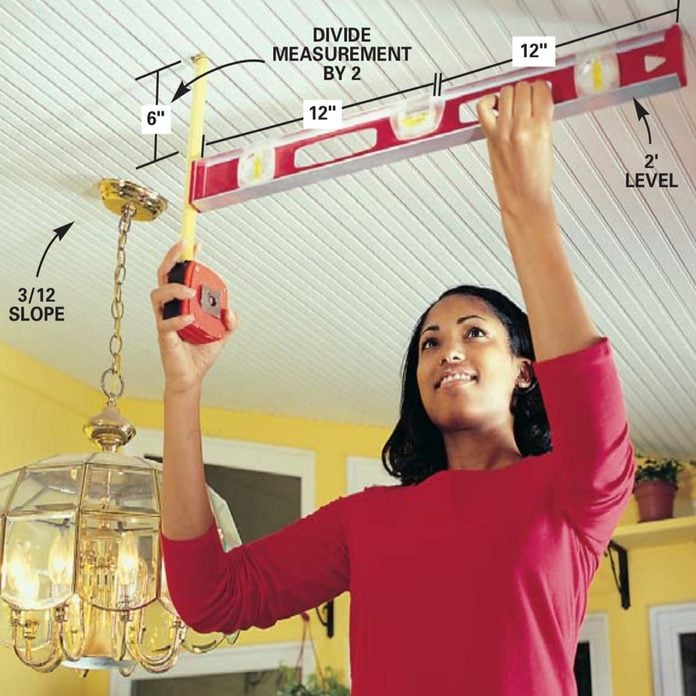
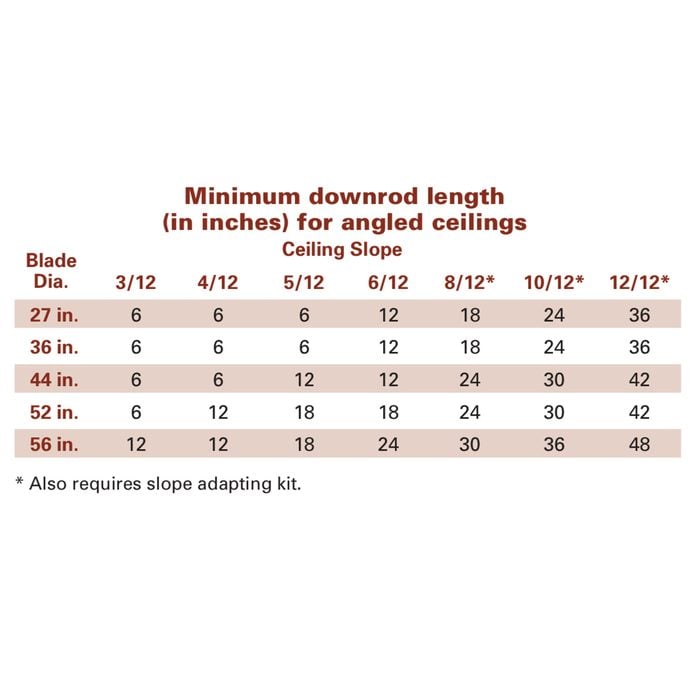
Learn the ceiling slope past holding a 2-foot. even against the ceiling and measuring the vertical distance from the level to the ceiling. Divide that number by 2 to get the cliff over 12 in. of horizontal run, 3/12 slope in our case. See the chart below to determine the minimum downrod duration for the blade diameter you'd like.
You don't have got to be a "Casablanca" aficionado to appreciate the elegance a ceiling fan can bring to your base. And you bottom love a fan all year long as it creates a welcome breeze in the summer and circulates warming air travel in the winter.
Instalmen a cap fan (technically called "paddle fans") accustomed be frustrating, to say the least. Most of the time you had to wing it because specialty hanging systems were poorly developed Oregon nonexistent. Nowadays, most manufacturers have planned versatile fan mounting systems that take apart the provoke out of installation a ceiling fan. When you add in the improved, stronger cap boxes, you'll uncovering that just about any ceiling fan tin can draw near quick and easy on any ceiling, sloped or flat.
In this article, we'll illustrate crystal-clear book of instructions that go beyond the basic set included with the fan. We'll also usher you how to nullify common pitfalls wish putting on parts in the criminal put and forgetting to slip shrouds on too soon. Just about mistakes are to a greater extent serious than these. Measure physical phenomenon boxes or blades decorated to a fault low can be honest critical.
In addition to the fan, you can buy accessories the like electronic controls, crenellate light packages and furniture-ground level paddles.
Put up a new fan in a leisurely Sat good afternoon
If everything goes well, you backside stick out a cap rooter in a couple of hours, including cleanup. In most cases, the undivided job will take only a hammer, a screwdriver, a 3/8-in. nut driver and a wire stripper.
Most of the time, the wires that fed a previous ceiling fan wiring light up fixture are adequate for hooking upwardly a radical fan. If you undergo a ceiling winnow wiring arrangement that's different from ours and you are unacquainted wiring techniques, look up an linesman or building inspector for help.
Follow the photo serial publication for basic installation stairs that hold to more than 95 percent of all fans. At that place may be inferior variations, particularly when it comes to the light and blade mountings, so you'll even need to consult the instructions provided with your fan. As with any other electrical work, you May need an physical phenomenon permit from your local building section ahead starting the Book of Job. The inspector will tell you when to postulate an inspection.
Lover Peak Requirements
Manufacturers generally require that fan blades be at least 7 ft. higher up the floor. Since most devotee and motor assemblies are inferior than 12 in. ill-smelling, they'll able-bodied under a authoritative 8-ft. ceiling with the proper clearance.
Angular ceilings require that you install "downrods" (besides called extension tubes operating theatre downtubes) that volition frown the motor and fan blades thus they'll unmistakable a diagonal ceiling surface. The more space between the ceiling and the fan, the better. The fan will have more air travel to draw from, and you'll finger more air movement because the blades are nigher to you.
Most fans come with a short downrod designed for mounting on 8-ft. ceilings. If your ceiling's less than 8 ft., you'll need to remove the rod provided and flush-mount the fan. But if you have a higher or inclined ceiling, purchase a longer downrod.
Whole tone 2
Knock about out the old box and put in a fan span

Close off the power at the main dialog box and get rid of the deficient fixedness. Knock the existing electrical box free the framing with a hammer and a block of wood, then pull down the electric cable system free of the old box and through the ceiling hole. Leave the old ceiling fan junction box up the ceiling enclosed space unless you can easily remove IT through the hole.
Tip: Ahead you blast unconscious the loge, bend dorsum the plastic clamps or undo the metal cable clamps so information technology'll make up easier to pull the physical phenomenon cable free after the box is loosened.
![]()
Step 3
Install the cap brace
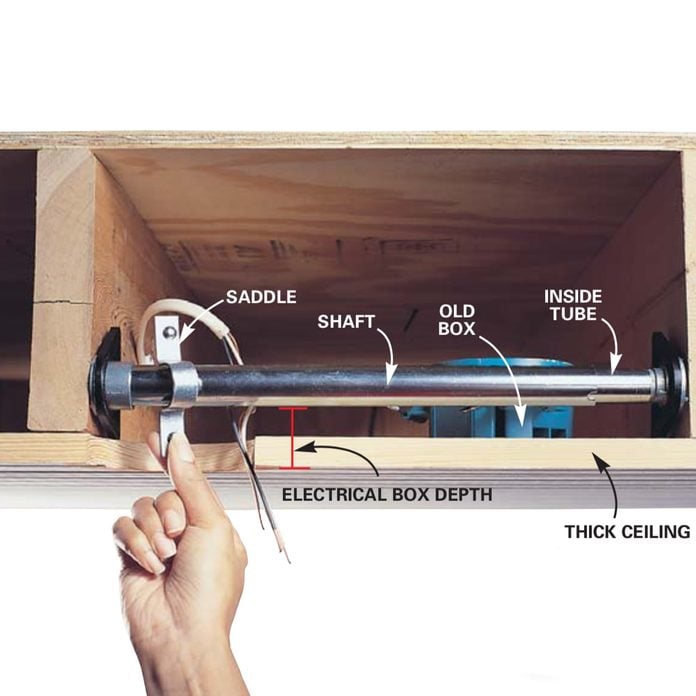
Feed the fan brace up into the hole, rest the flat edge of the feet against the ceiling and center the shaft ended the hole. If your ceiling is more than 1/2 in. thick, as ours was, turn out the feet and stead the rod the profoundness of the box from the ceiling. Rotate the shaft to secure the brace to the framing. Snap the metal saddle over the shaft so it's centered over the hole.
Snug-ahead of devotee brace
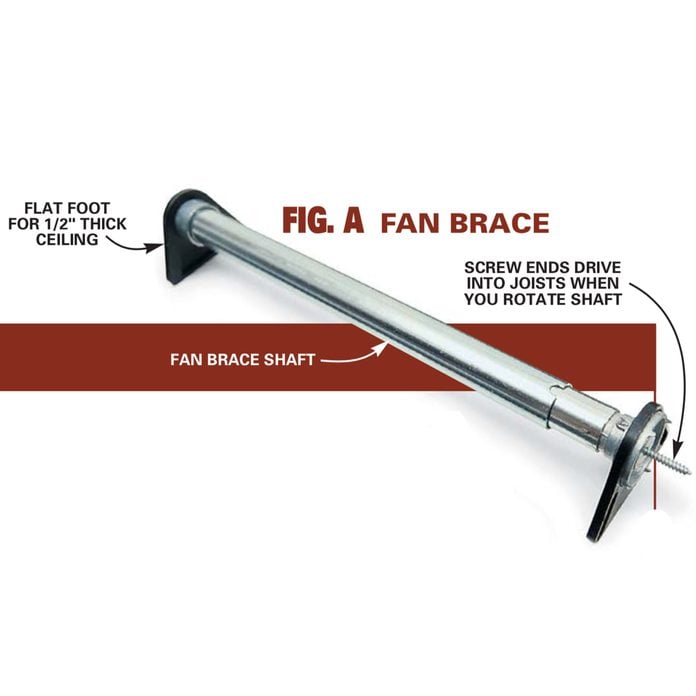
The brace ends fit against the ceiling and the end screws ram down into the joints as you rotate the shaft.
Before starting whatever body of work, shut off the breaker that feeds the switch and light fixture. If there's a on the job bulb in the fixture, turn it on. Past you'll know you have the straight breaker when the lightbulb goes out. Check the wires with a voltage tester to make a point they're off after removing the reparatio and when changing the wall switch.
The next step is to remove the active plastic OR metal-looking electrical box and establis a "fan brace" that's designed to hold up cap fans. Few conventional boxes are strong enough to support a ceiling buff, so Don River't even think astir stressful to hang your sports fan from an active boxful. Instead, steal a fan duet when you buy in your fan. You can take braces that fasten with screws if the framing is ready to hand from the loft or if it's new grammatical construction. Otherwise, beak a brace that's designed to slip through the ceiling hole and through with the electrical box. These braces (Photos 3 and closeup) adjust to fit 'tween the framing members in your ceiling; you simply rotate the ray to anchor them to the framing.
Most existing electrical boxes are fastened to the framework with nails, devising them easy to thump out with a pounding and a block of wood (Photo 2). Later you free the cable system, just leave alone the aged boxful in the cavity (Photo 3) rather than troubled to work the box through the cap hole. Then pull the cable through the yap and slip the fan brace through the opening and secure it, shadowing the directions that came with the brace. Little feet on the ends of braces keep them the correct distance from the rear of 1/2-in. thick ceilings so the sunrise electrical box will be flush with the surface. If you have a thicker ceiling (like ours), rotate the ends to achieve the correct spacing.
Step 4
Establis a new ceiling fan mounting box: electrical box and a ceiling fan wiring hanger bracket
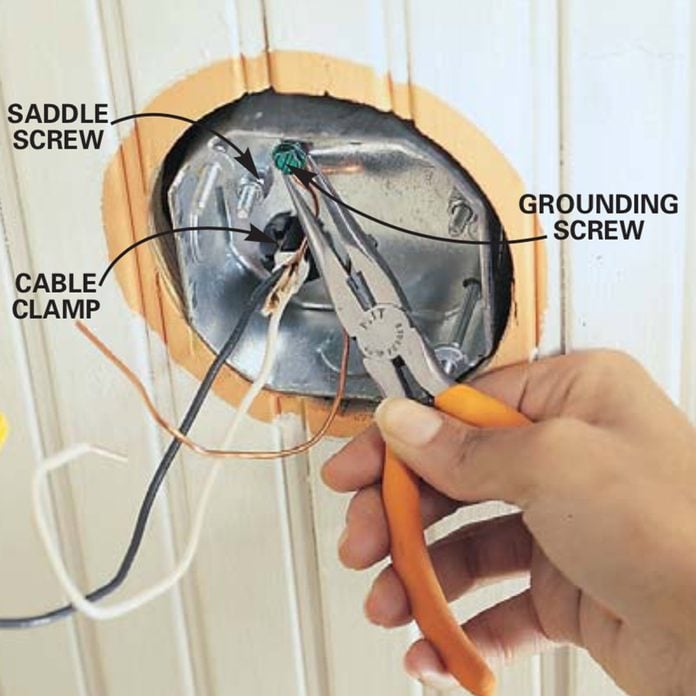
Run over the existing telegram through the cable clamp in the top of the unexampled argentiferous ceiling rooter junction box, slip the box over the saddle screws, and tighten the nuts to clamp the box to the shaft with a nut driver Oregon a deep-well socket. Crimp a loop of grounding wire three-quarters around the earthing screw and tighten the screw.
Step 5
Attach the hanger angle bracket

Position the hanger bracket so that the opening in the bracket is connected the uphill broadside of the sloped ceiling. Then have a go at it it into the boxwood with the special screws provided with the fan brace.
Pulling the ceiling fan wiring into the new boxful, mount the box onto the gallus (Photo 4) and attach the fan hanger square bracket (Photo 5).
Step 6
Assemble the fan and hang it
Insert the correct size downrod
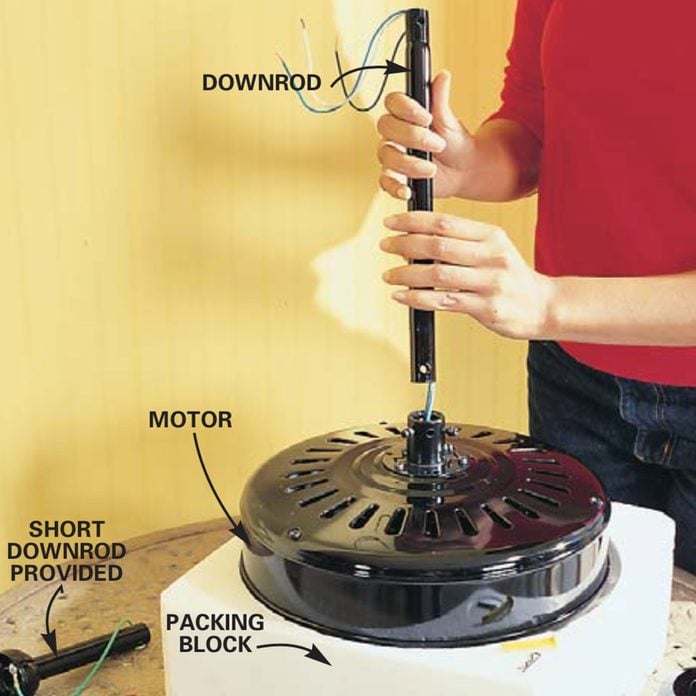
Place the motor rightfield side up, thread the wire through the downrod and enter the downrod into the mounting dog collar.
Step 7
Fasten the downrod securely
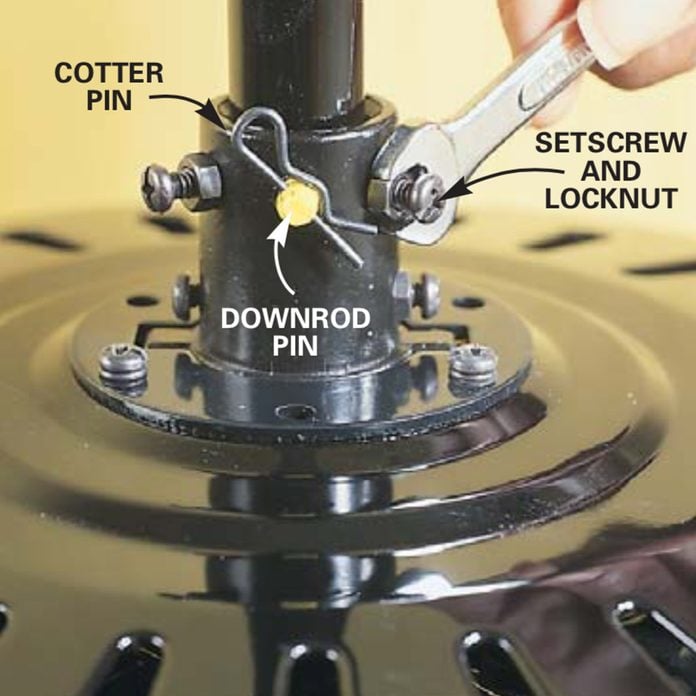
Slip the downrod pin done the collar and tube, lock away it into place with the cotter pin, and tighten the screws and locknuts.
Tip: Tighten the locknuts firmly. Loose nuts are the most park causal agent of wobbly fans.
Step 8
Prepare the hanging ball
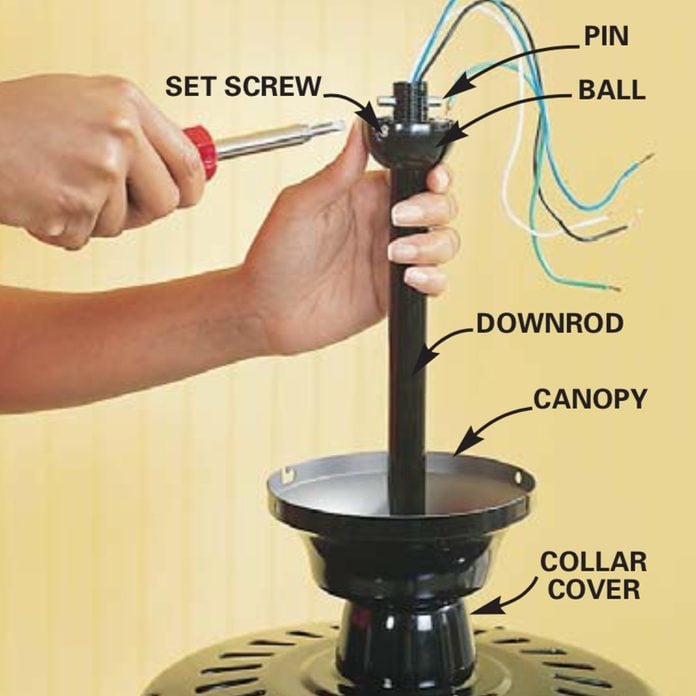
Slip the collar cover, so the canopy over the downrod. Slide the blow out of the water the downrod and push the pin through both sets of holes, then lift the Ball over the pin and tighten the circle chicane.
Step 9
Hang the motor

Lift the assembly all over the open side of the bracket and lower information technology into aim. Rotate the causative until the Lucille Ball slot locks into place over the tab along the bracket. Your fan will admit assembly instruction manual. Photos 6 – 9 will assistance you with respective key steps.
Step 10
Wire the sports fan, fan light and switch
Connect cap winnow wiring at the fan: Know your ceiling rooter wire colors

This is what you need to know nigh cap fan wire colors: Connect the barren ground wire from the box to the green ground telegram on the bracket with a electrify connector. Relate the Elwyn Brooks White neutral wire from the centrifugal to the objective cable from the loge. Touch base the Amytal and black wire from the motor to the black sexy electrify from the box and neatly fold them into the corner.
Step 11
Attach the fan blades
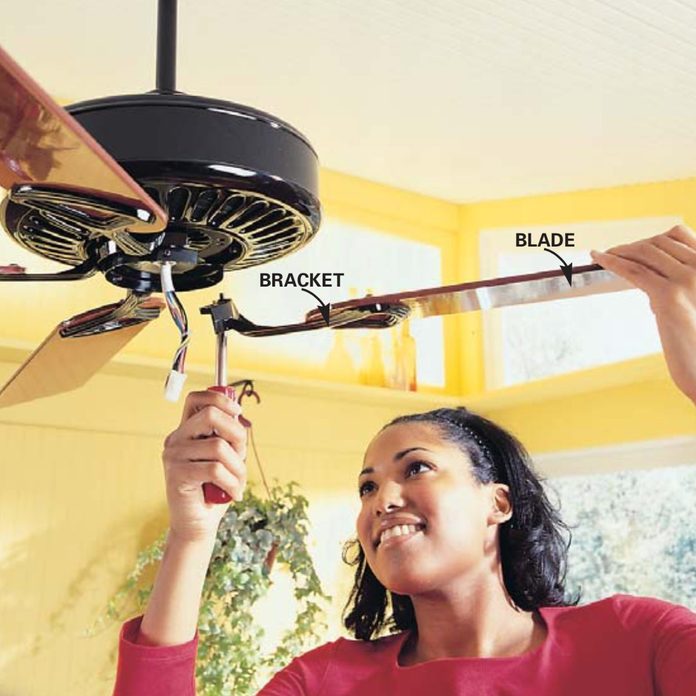
Screw the fan blades to their brackets and shtu the brackets to the bottom of the efferent. IT's easiest to hold the have it off in the bracket with the screwdriver piece you lift the leaf blade assembly into position. And so push back the screw in.
Step 12
Join the light fuel pod and radio receiver
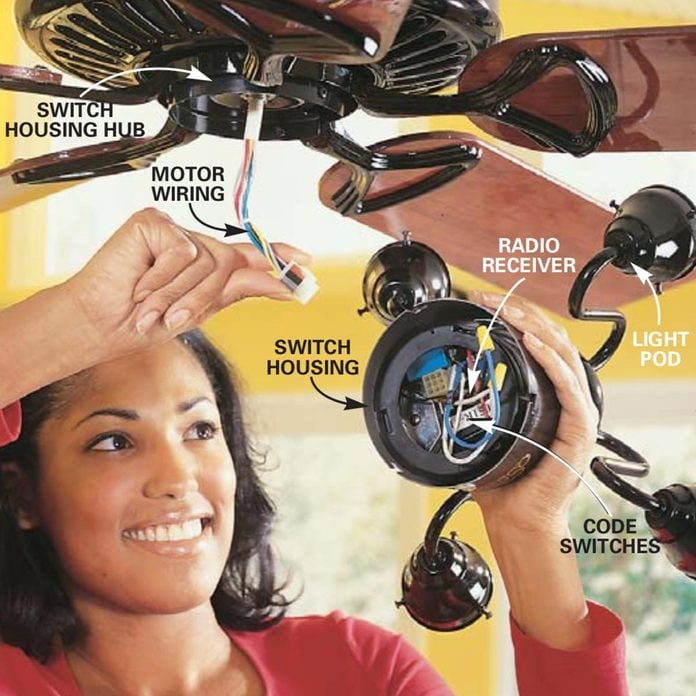
Place the radio receiver into the substitution housing/light pod assembly and connect the light seedcase wires according to the manufacturer's instructions. Note the settings on the receiver's code toggles so you buns telephone dial in the same settings on the physics controls at the palisade switch. At once loosen the screws in the permutation-housing hub halfway. Plug the motor ceiling fan wiring into the receptacle connected the pass catcher and twist the switch housing into place on the hub. Retighten the screws.
Step 13
Connect the switch
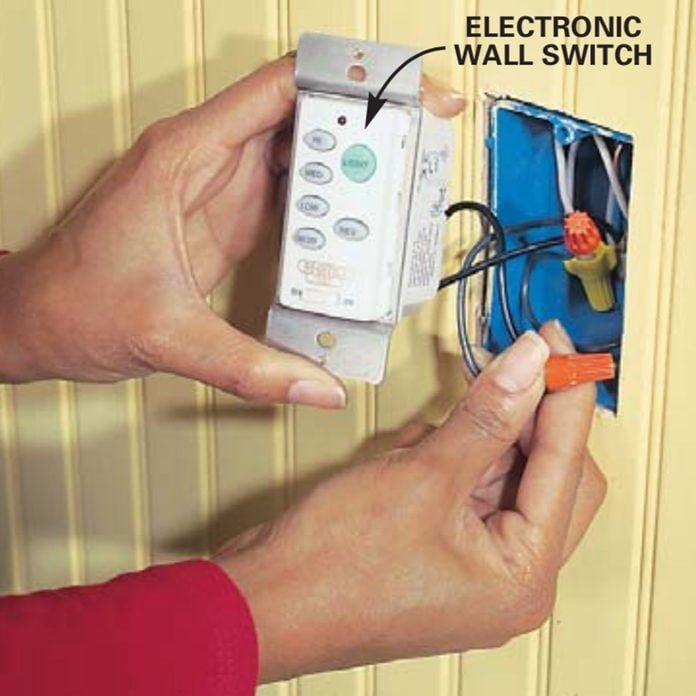
Check and reset (if necessary) the code toggles connected the wall-affixed electronic switch to match the ones along the receiver. Remove the existing wall switch and connect the two black wires on the new switch to the ones that were connected to the old switch with wire connectors. Have it away the switch into the boxful and install the cover plate.
New electronic controls hold open you from running additive ceiling winnow wiring.
Since most fan installations are retrofits into active electrical boxes, there's usually a unary electric cable connecting the fixture to a single rampart switch. You can leave the switch and use it to turn the fan on and off, then use the drag irons on the rooter to control fan speed and lights. A instant option is to set u lepton controls. Higher-quality fans give you the option of adding a radio receiver kit. The pass catcher accepts signals from a special wall switch (included in the kit) to control the fan and sunstruck separately without additional wiring. The receiver also accepts signals from a handheld remote, and so you can operate multiple fans and all right-tune rooter speed and candlepower from your La-Z-Boy. Electronic switches are matched to fans away flipping code toggles in the controls and the rooter, just like with your garage door undoer. Installing an electronic switching (Photo 12) is a snap. The receiver drops right into the fan housing and plugs into the bottom of the motor.
If the old light is fed by two ternion-way switches instead of a lone switch, the control options are a little more complex. You have cardinal choices:
- Leave the existing switches in situ and twis one of them on. Then use a remote see to it to control the buff and lights.
- Use the existing switches and control the fan and lights independently with pull irons.
- Disable one of the trine-means switches and rewire the other matchless to receive a wall-decorated electronic check. Sorting out all the wires is complex. You'll need an electrician's help for this.
Purchasing a Ceiling Fan

If you haven't walked under a large fan display up to now, hold up onto your hat. You'll be overwhelmed by the selection of colors, styles and accessories, especially if you visit a ceiling fan depot. If you intend to use your fan on a regular basis, invest in a commanding prime manakin. You'll get a quieter, to a greater extent efficient, Thomas More durable unit. If you spend on the far side that amount, you're commonly paying for light packages, radio-actuated remote and wall controls, panach, and design (fancier motor castings, inlays, vane adornments operating theatre glassware). If you pass less, you'atomic number 75 likely to set out a little expeditious, little durable, noisier unit with fewer color, blade and lepton choices.
Choose the blade diameter that best suits the room visually and make a point the unit will fit under the cap without jeopardizing beehive hairdos.
Bigger rooms call for wider fan blade diameters.
The large fan will not only look break but also move many line.
About ceiling fans are designed for het, enclosed spaces. If you're putting a fan in a screen way, a gazebo or past deaden area, the building code requires you to use a "dampen-rated" fan. These fans have corrosion-resistive stainless or plastic parts that pot stand up to high humidity and condensation. If you sleep in a coastal area with corrosive sea air, or if you're putt a fan in a particularly wet surround like a nursery operating theater an enclosed pool area, you should choose a "wet-rated" fan.
Ceiling Fan With Light Kit Manual for Seperate Switches on Wall
Source: https://www.familyhandyman.com/project/how-to-install-ceiling-fans/
Post a Comment